Tips for painting kitchen cabinets – 17 ways to an expert finish
These expert tips for painting your kitchen cabinets will ensure you get a sleek new look

If you are looking for tips for painting kitchen cabinets, it's likely your kitchen is looking a little tired. Changing the color of your kitchen cabinets will have a major impact on the entire room, as will simply smartening up an existing painted kitchen that is a little worn.
Calling in the professionals to paint every cabinet and drawer is a route you might wish to explore. However, with a few top tips from the pros in the know, painting kitchen cabinets isn’t out of the question, even for the most novice DIY-er.
To achieve a professional finish, first acquaint yourself with how to paint kitchen cabinets from start to finish. Once you know how, step-by-step, use this tips for painting kitchen cabinets from decorating professionals to get an expert job done.
Tips for painting kitchen cabinets – from decor experts
Whether you have been browsing new painted kitchen cabinet ideas for new ways to smarten up your kitchen cabinetry or simply want to update kitchen cabinets without replacing them, you'll need tips for painting kitchen cabinets to get a professional finish. These are sourced from decorating experts.
1. Give yourself plenty of time
'Give yourself time – one of the biggest tips I can give for painting kitchen cabinets is that this isn’t a rush job,' says Homes & Gardens' Editor in Chief and serial renovator Lucy Searle. 'You will need to get equipped with high quality kit and materials before you start and allow around a week to complete the renovation properly.'
2. Know that preparation is key
All the experts agree, preparation is key. Preparing your kitchen cabinets for painting by cleaning, sanding and priming the door fronts will achieve a smooth, longer-lasting finish.
'Don’t forget the prep work,' says Lenny Brickowsy, an experienced handyman from Cleveland.
3. Remove the doors and clean
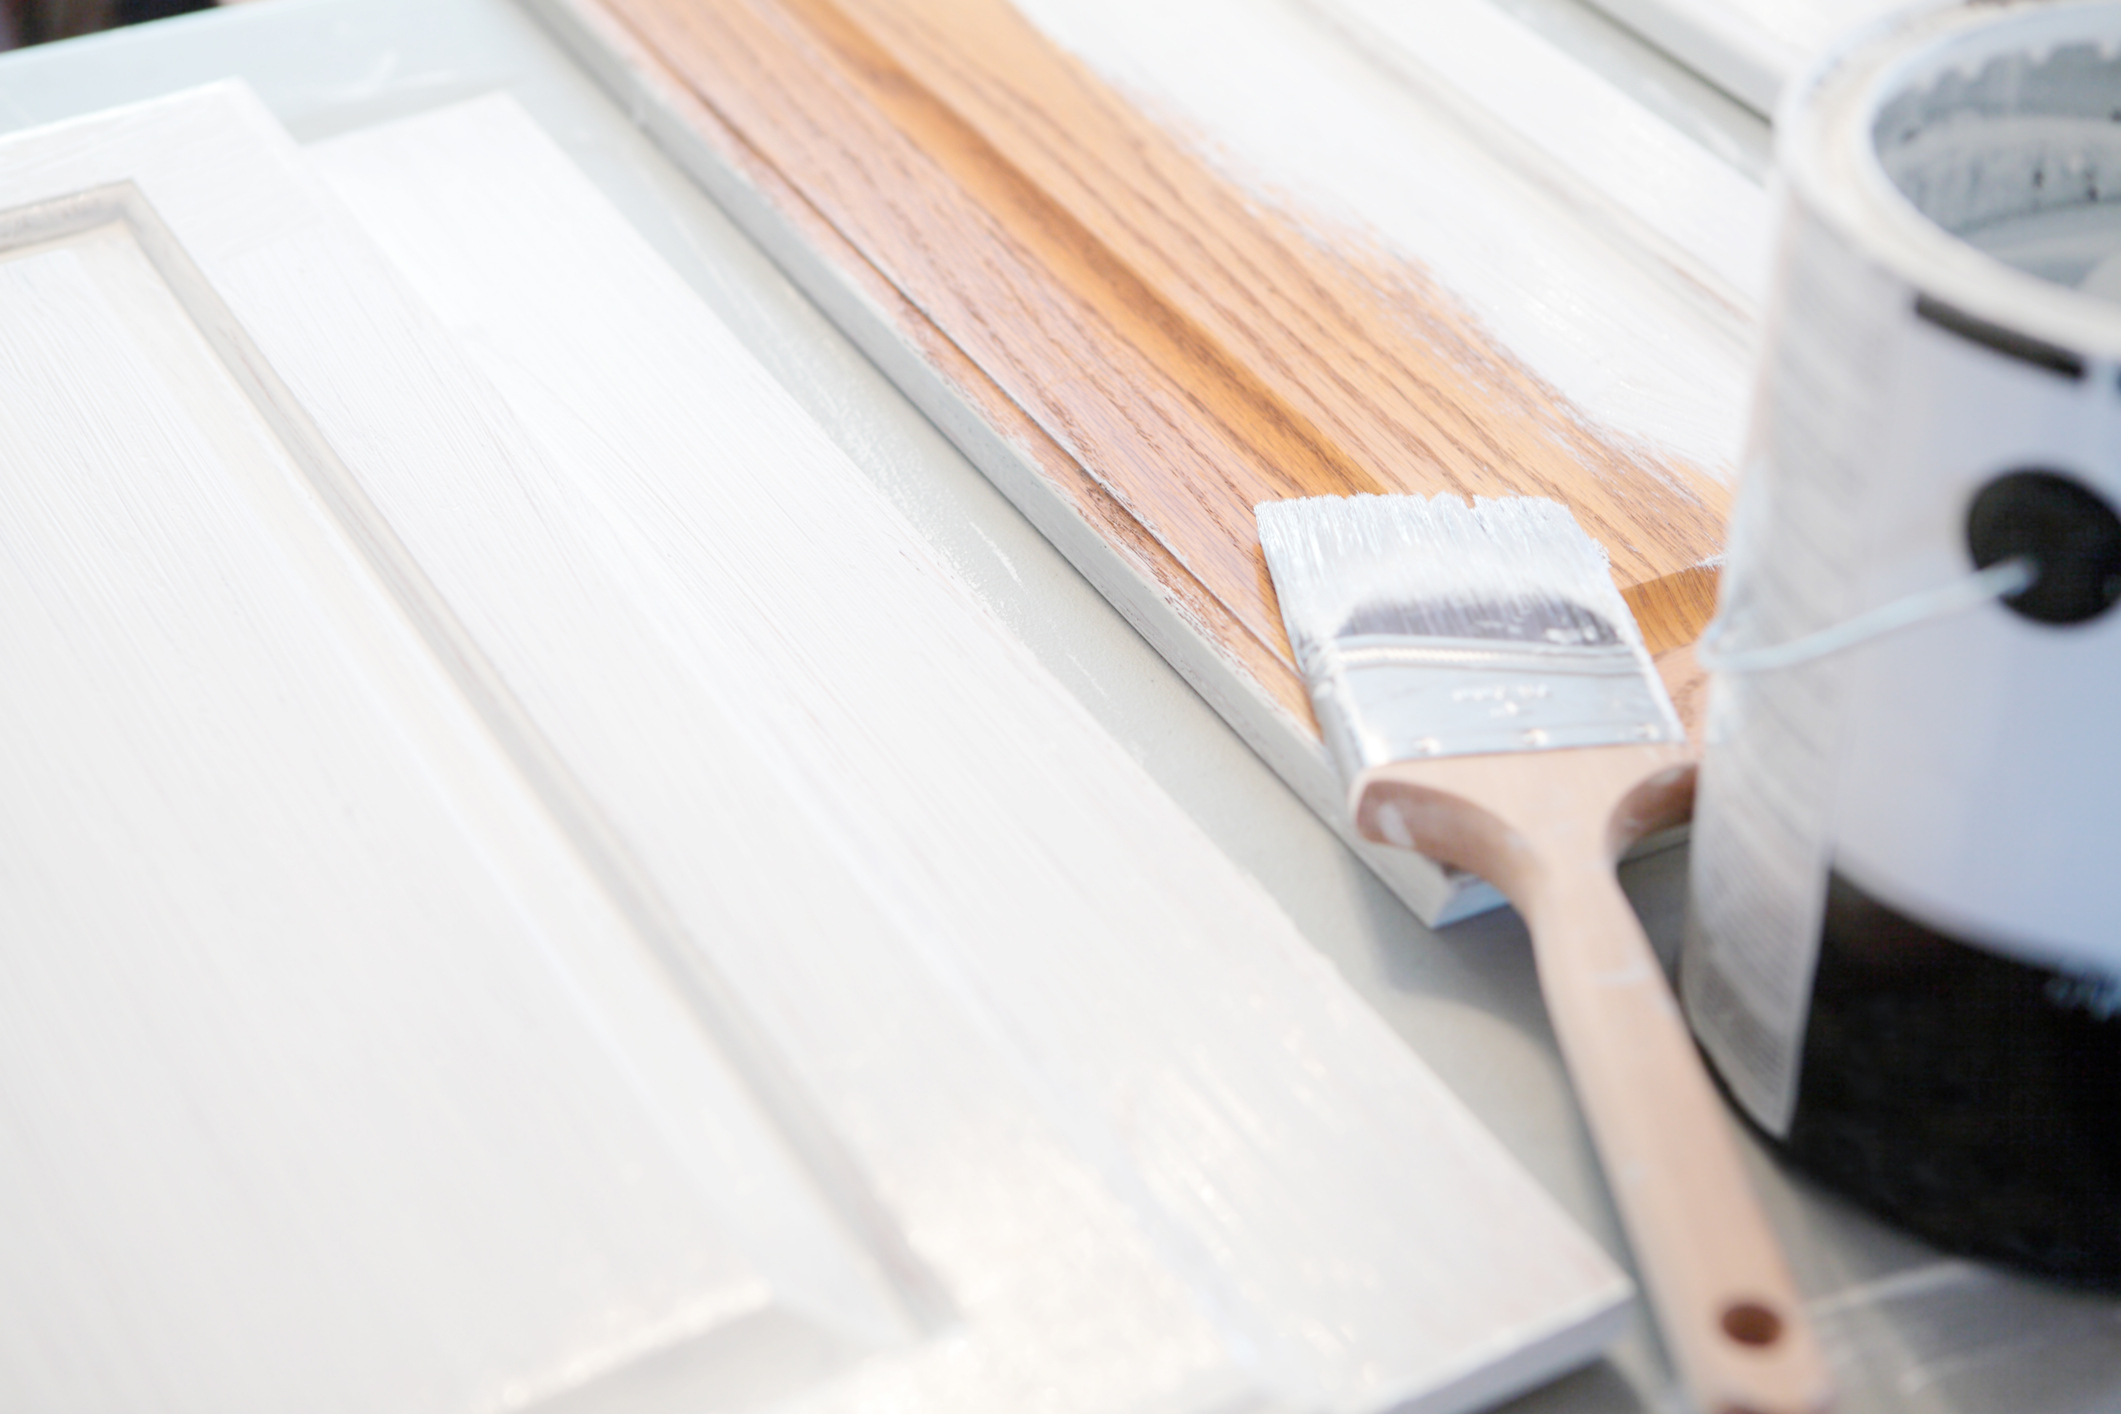
The first step is to remove the doors and drawers and clean every part thoroughly.
'Empty and thoroughly clean all the cabinets, making sure that all the dirt and grease are gone, plus remove all parts you aren’t going to paint, like the knobs and handles,' says Lenny Brickowsy. Of course, you might want to take the opportunity to install kitchen cabinet handles with a different look to complement newly painted doors.
Use a vacuum cleaner to get rid of all the dust and debris in the cabinets and clean each one fully – it should take around five minutes per cabinet.
4. Keep hardware somewhere safe
After removing the hardware, Geoff Sharp of Sharper Impressions Painting suggests putting it all into a bag for safe keeping: 'Label the doors/drawers and hardware bags with numbers so you know where to replace them,' he says.
5. Make a note of everything you do
Tony Adams, a painter at DIY Geeks adds: 'If this is the first time you are doing a DIY project, you should write down every step of the disassembling process so you know how to reassemble the doors and hinges back on when you’ve finished painting.'
6. Set aside a dedicated space
If you are taking off doors and drawer fronts to paint, you will need space, and it needs to be clean, dry and rarely used, a garage or workshop. Of course, the backyard is an option but bear in mind that the wind will blow debris on to wet paint, and that the debris will stick.
7. Protect paint-free parts
If you are considering painting the doors in situ, it is key to protect the paint-free parts such as hinges, countertops and appliances by carefully taping them off.
'Make sure you protect any walls or surfaces you don’t want to get paint on, by running masking tape along the edge of the cabinets,' says Yvonne Keal, senior product manager at Hillarys. 'Lay down sheets on countertops, floors and appliances too, to catch any splashes of paint.'
Repair any holes and imperfections using a wood filler.
8. Check your kitchen cabinets' material
Different door and drawer materials require slightly different treatment. So, check what your kitchen cabinets are made from before you set about on the transformation project.
'The best cabinet surface to paint is wood,' says Kerry Sherin, consumer advocate at Ownerly, a US-based home valuation company. 'Unfinished, painted, stained wood, MDF and compressed/faux wood all work well. Any material which can be scuffed up with sandpaper in order to allow for paint adhesion is viable. This is why laminates are a bad choice – you can paint them, but it will not last. You must first de-gloss stained wood and glossy surfaces and use a liquid sander applied with a rag.'
Be aware that there are other options for refreshing wood cabinets: you might want to refinish kitchen cabinets with varnish or stain kitchen cabinets as an alternative to painting.
9. Sand every surface you want to paint
Lightly sand every surface (be it lacquer, varnish or even the sheen of a previous paint) to create a slightly, etched surface – or key – for the paint to adhere to.
'Sanding is key!' exclaims Grace Baena, interiors curator of Kaiyo, an online marketplace for pre-owned furniture. 'The reason why you see so many DIY-painted cabinets chipping or with flaking off paint is usually because they aren’t well sanded. Remember you need to sand cabinets between every single coat of paint too – not just at the very beginning. You also want to make sure you sand corners, edges and any crevices really well, as that’s where chipping is most likely to occur if not prepared properly.'
Experts advise using a random orbital sander to get better and faster results, although tricky parts like cabinet door edges should be hand sanded. If the cabinets haven’t been painted or stained before, start with a medium grit sandpaper before using a finer one. If there is excessive paint or a considerable rough surface, consider stripping.
Use a vacuum to get rid of the dust from the sanding and wear a dust mask as a sensible precaution.
10. Prime the doors properly
After you have thoroughly prepared the kitchen – including cleaning the cabinets once more after sanding, to make sure they are dust free – priming is the important next step.
'Apply a minimum of one coat of primer,' says Dean Mergel, general manager of Colour Envy Painting in Alberta, Canada. 'If you are painting a wooden product, make sure you use a primer that will block the natural wood tannins from showing through the paint. Usually, an oil-based primer is best for this process.'
Tony Adams of DIY Geeks advises applying two coats of primer using a paintbrush: let the first coat dry thoroughly (around 1-2 hours) before applying the second coat. 'When the second coat of primer is fully dry, lightly sand the primer using fine sandpaper.'
Avoid using all-in-one primer and paint products say the experts as they won’t give the same professional finish.
11. Use the right paint
Whether you fancy a deep navy blue, a sugar-sweet pastel or a plain white, it is important to choose the right type of paint and the right paint finish to revamp kitchen doors. All of our interior experts recommend choosing high quality paint in thin coats to create better coverage and a longer lasting, professional finish.
'Don’t skimp on the paint,' states Lenny Brickowsy, an experienced handyman from Cleveland. 'You’re already saving money by doing the job yourself so spend the extra few dollars and get a good, high-quality color.'
In terms of paint finish, a gloss, satin or semi-gloss will create a tough hardwearing surface that is resilient and wipeable, says Tiffany Payne, director of marketing at Orangeries UK.
'Durability is the most important characteristic of your chosen paint finish in the kitchen,' says Helen Shaw, director at Benjamin Moore. 'Kitchen cabinets and islands work incredibly hard and are subject to the bumps and scrapes of a busy household, so it is important your chosen product is up to the job. Eggshell is one of the most popular finishes, offering low levels of sheen for a smart, contemporary finish. Satin finishes are durable enough to wipe away finger marks or stains; if you prefer a more reflective finish, opt for a semi-gloss or gloss paint.'
12. Try tester pots for the right color
Choosing the perfect color is no mean feat with so many different options around. Look at your current countertop, fixture and flooring for color cues that might inspire your cabinet refresh. Darker colors work really well on the lower cabinets with light gray, white or neutral on the upper cabinets to draw the eye up. Galley kitchens might benefit from a dark shade on one side and a lighter color on the other, to help prevent it from feeling too closed in.
'Make sure to sample!' says Arianna Cesa, associate manager at Benjamin Moore. 'Always make sure to view the color in your kitchen before you paint. Every kitchen is unique and lighting plays a huge role in how the paint color will cast in the space.'
13. Brush or roller or spray? Get it right
For cabinets, two coats of top paint are essential to build the surface; for the best results experts recommend using a brush, preferably a two to two-and-a-half inch, fine bristle brush. Others suggest a combination of roller and brush: painting with a roller is a lot faster than brush painting but the texture the roller puts on cabinets makes it unsuitable for gloss paint.
'We recommend you use a good quality smooth mini roller to give the best finish – such as the Two Fussy Blokes – these rollers are exceptional and make light work of an onerous task,' says Victoria Yardley of Victory Colours. 'Try a sustainably-sourced paintbrush for all the edges and corners.'
Alternatively, spraying the cabinets will leave a smooth, professional finish. However, you will need adequate space and specialist equipment to set up a temporary spray booth, so it might be wise handing this option over to the experts.
14. Apply at least two topcoats, sand in between
Apply at least two coats of paint, ensuring each coat is left to dry fully before starting the next, around one to two hours at a time.
'Sand in between coats to make sure the surface is perfectly smooth before applying the next coat. Then make the last coat a thin one,' explains Caroline Thornborough of Thorndown. 'Some lighter colors or semi-opaques can look better with a third coat as it will increase the opacity and richness of color.'
15. Get your painting techniques just right
Dip your paintbrush into your chosen paint and gently swipe the brush into any nooks or hard-to-reach areas of the cupboards first. 'After getting into the tricky areas, cover the remaining surfaces of the cabinet with the paint using a handheld roller,' adds Yvonne Keal of Hillarys. 'Make sure you leave it to dry for a couple of hours before retouching any mistakes.'
Another recommended technique, says Anna Hill, brand director at Fenwick & Tilbrook, involves rolling eggshell onto the prepared surface with a foam roller and then ‘laying off’ – or brushing off softly in one direction to create a smooth, even finish.
16. Keep the room well-ventilated
Keep the room well ventilated says Kerry Sherrin of Ownerly, direct a fan out of the window and wear masks that paint stores sell. 'Keep the work area clean, a painting project should not look like a war zone,' say advises.
17. Leave plenty of drying time
'My top tip is to give yourself plenty of time, don’t rush it!' says Victoria Yardley of Victory Colours. 'Thinner layers of paint are better than thick layers (less is more) and make sure you let the paint dry fully between coats. Paint needs to cure for quite some time, often up to 28 days.'
Even when the last coat is touch dry, the curing/fixing process takes longer which is why the pros recommend leaving it for 12 to 24 hours at least.
“Paint takes a couple of days to thoroughly harden (cure) so keep the bashing about with pots, pans and tableware to a minimum for a while,' says Marianne Shillingford, creative director at Dulux.
What is the most important tip for painting kitchen cabinets?
Though there are no hard and fast rules, removing kitchen cabinet doors to paint them, then removing the hardware before laying them flat will give you the most reliably professional finish.
If you don't remove the cabinet doors to repaint them, mask off hinges and handles with tape so they don’t get messy with paint splashes. However, it is easier to paint the cabinets' façades with the doors off.
Sign up to the Homes & Gardens newsletter
Design expertise in your inbox – from inspiring decorating ideas and beautiful celebrity homes to practical gardening advice and shopping round-ups.
Lara has worked in the ever-changing world of interiors and lifestyle journalism for many years. She cut her teeth in a busy newsroom of a kitchen and bathroom business title where she gained vast product knowledge and industry contacts that would prove invaluable. She now freelances for a variety of magazines, newspapers and online blogs and relishes the changing landscape of the interiors world.
-
 6 items you should always unplug before leaving the house – banish 'phantom power' usage
Don't let these mistakes cost you a small fortune
By Sophie Warren-Smith Published
-
 How to fertilize magnolias – garden experts reveal the secrets to better blooming, and timing is critical
Magnolias are famed for their spring flowers, and feeding at the right time can give trees a boost
By Thomas Rutter Published
-
 7 dorm room organizing rules for less clutter and more space
Experts offer their top tips for creating a well-organized dorm room, no matter the size, space, or layout.
By Ashley Chalmers Published
-
 How to maximize storage in a small or shared dorm room, according to pro organizers
Find out all the hidden storage zones you might never have noticed
By Ashley Chalmers Published