This paint edger tool saved me hours of painting time – and I would never redecorate without it
I picked up an inexpensive cutting-in tool on a whim and it made painting my bedroom so much quicker

Painting is an incredibly time-consuming process, especially when it comes to delicately cutting in walls and painting around wall-mounted radiators and built-in shelving.
When I was at the hardware store picking up some paint rollers to prepare for painting my bedroom, I noticed a painting cut-in tool – a flat panel made of the same material as a roller – and decided to pick one up on a whim. After all, it couldn't make the job any harder.
I am not over-exaggerating when I say that painting a room without it would have taken me at least an hour more – and it helped me around all those awkward corners. Here is how I used the paint edger tool to make my job simpler, and why I think every painter needs one.
The benefits of using a paint edger tool
Cutting in is an interior painting tip we hear over and over again, but a surgeon-steady hand is something I have never had and am never likely to experience. As a result, cutting in is usually messy and time-consuming as I try to avoid paint brush lines and a thick border around my wall.
Once I had prepared walls for painting by taping up trims and cleaning the walls, I dipped the painting cut-in tool into my roller tray of paint to cover it before pressing it to the corner of the wall and swiping it along with even pressure. It left behind a smooth, even layer of paint that was neater than any paintbrush cutting in I had done before.
It was safe to say I was more than impressed with my impulse purchase. The tool I used was six inches wide, giving me a decently sized border to then easily blend in by painting with a roller.
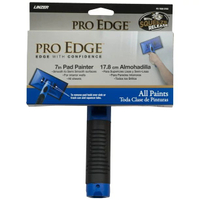
ProEdge 7” Painting Pad | $8.24 from Walmart
This painting pad is similar to the one I used to tackle my bedroom painting project and is perfect for cutting in and working in awkward spaces that are too small for a roller.
The tool helped me paint behind the radiators and get into the awkward gaps, so that there wasn’t any visible border of old paint around the edge of the fitting – something that would have been noticeable had I tried to use a paintbrush with a bulky handle.
I made sure to clean behind the radiator first with a Swiffer, available at Walmart, and then slotted the paint-loaded tool behind, again swiping it along the wall with even pressure.
While professionals will likely tell you to remove any wall-mounted fittings altogether, I have zero plumbing knowledge (at the moment, anyway) so disconnecting them both from the wall was not an option for a DIYer such as myself. The tool was a fantastic alternative.
@beautyandabuilder ♬ FEEL THE GROOVE - Queens Road, Fabian Graetz
My shelving units were the next tricky task to face when painting a wall in the bedroom. While I could remove the narrow shelves themselves, the unit that held the shelves was fastened tight to the wall. The result was tall, narrow sections where the wall was visible in between two sections of varnished wood.
The paint edger tool made this section a dream to work with – and by this point, I was so glad I had picked it up last minute. A normal roller wouldn't fit in the gap and a paintbrush would have left faint lines. The cutting-in tool let me swipe paint down the wall quickly and evenly. I thought that the shelving unit would be the most difficult section in the room, but in the end, working around the whole shelving unit took me less than 15 minutes per coat.
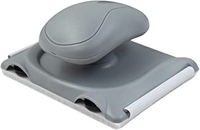
RollingDog Paint Edger Pad | $11.99 at Amazon
This painting cutting-in pad has a replaceable pad to help with cleaning, and guide wheels to help with getting perfectly straight lines along trims and adjacent walls.
My verdict
The tool made cutting-in a breeze, especially considering that I am not the best of painters and I do not have a steady hand. The flat panel was easy to coat in paint and swipe along the bases and edges of the walls without having to worry about keeping a straight line or leaving paint brush marks behind.
Better yet, the width of the panel meant that it was then easy to use the roller without having to get even remotely close to the trim and risking bumping it – avoiding any messy wall painting mistakes.
The only negative to mention was that the edge of the tool became loaded with paint as I went on, meaning that the adjacent wall suffered from a narrow paint line when I was cutting in the sides and the top of the wall near the ceiling. As I was painting all four walls and had taped the trim off at the ceiling anyway, this was not too much of an issue. However, if you are painting one wall, or have no ceiling trim, then you could either carefully apply painters tape to these areas, or find a cutting-in tool with a hard edge to prevent paint from leaching through the fabric and leaving lines.
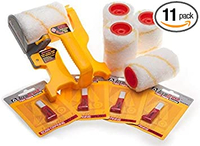
Accubrush Paint Edger Roller Set | $44.95 at Amazon
This professional painting cutting-in tool has a protective edge to prevent paint from marking adjacent walls when cutting in.
FAQs
What is the best tool for cutting in paint?
The best tool for cutting in paint will depend largely on where you are cutting in. For walls, a cutting-in tool with a flat panel is ideal for providing a thick cutting-in border without the need for a steady hand. However, a narrow paintbrush may be more practical in smaller spaces.
What is the point of cutting in paint?
Cutting in paint has two purposes. First, it can help to paint around tight spots such as edges of walls, ceiling lines, around doors, and along baseboards to avoid having to get a roller too close and bumping areas you do not want paint on.
Second, professionals often use cutting in in place of painters tape for a quicker job. Painters with plenty of experience are able to create a perfect steady line along trims without spilling over.
Painting this bedroom was easily the quickest and smoothest paint job I have completed so far, and this handy tool made all the difference. When coupled with other painting tips like removing painters tape at the right time and painting trim and walls in the right order it came out looking perfectly professional.
Sign up to the Homes & Gardens newsletter
Design expertise in your inbox – from inspiring decorating ideas and beautiful celebrity homes to practical gardening advice and shopping round-ups.

Chiana has been at Homes & Gardens for two years and is our resident 'queen' of non-toxic living. She spends most of her time producing content for the Solved section of the website, helping readers get the most out of their homes through clever decluttering, cleaning, and tidying tips. She was named one of Fixr's top home improvement journalists in 2024.
-
 5 things people with clean upholstery always do – simple, quick and oh-so-effective
Ensure your furnishing looks clean year-round with these expert tips
By Seraphina Di Mizzurati Published
-
 7 native perennials to plant in April – for glorious flowering displays to attract bees, butterflies, and hummingbirds
Discover some of the best perennials to plant in April to make your garden a hotspot for wildlife
By Drew Swainston Published
-
 7 dorm room organizing rules for less clutter and more space
Experts offer their top tips for creating a well-organized dorm room, no matter the size, space, or layout.
By Ashley Chalmers Published
-
 How to maximize storage in a small or shared dorm room, according to pro organizers
Find out all the hidden storage zones you might never have noticed
By Ashley Chalmers Published
