How to tile stairs – expert advice for tackling this tricky project
Brighten up the hallway with tiled stairs – here’s how to tackle this DIY project over a weekend


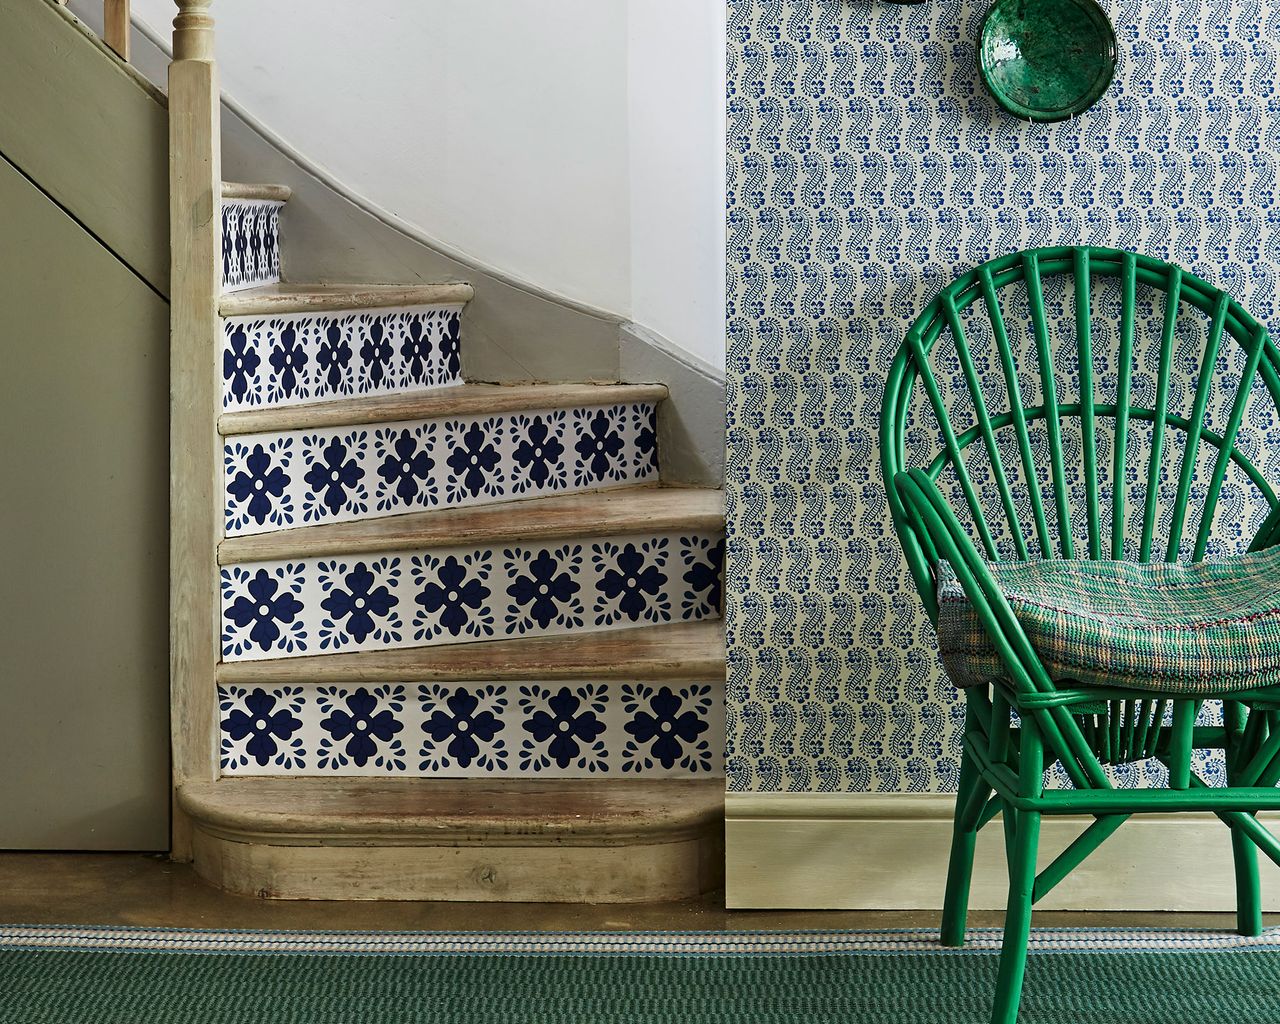
When decorating the home, one area that is often overlooked is the stairs. While we think about surfaces in terms of walls and floors, adorning them with paint, wallpaper, carpet, timber, stone, laminate, porcelain and yes, tiles, stairs can also have a huge impact on the finished look and feel of your interior. So why not tile the stairs and give the hallway an update that creates a warm welcome into your home.
There are plenty of tricks you can do to make this task easier and it’s a project that any confident DIY-er can take on over a weekend.
‘When tiling stairs, it's best to work your way from bottom to top in order to get things lined up just right on the risers,’ explains Todd Saunders, CEO of Flooring Stores, a resource for finding the right type of flooring and contractor for any project. ‘Getting specific tiles for the edges of the treads will save you a lot of time on the wet saw. It's also best to go with a tile that has some texture to it to provide for better tread.’
So, with this in mind, here’s our handy guide on how to tile stairs, with expert advice from the professionals. You can also find more in-depth advice on grouting tiles, how to tile a wall and how to tile a floor as well as how to clean kitchen tiles, which will all help boost your tiling knowledge.
How to tile stairs
While stairs are certainly a practical and necessary part of any two-storey home, they can also be turned into a statement area with a decorative tiled finish.
1. What you'll need
Before you begin, get all your tools and materials together and, most importantly, choose a time to tackle this project when no-one needs to pop upstairs. Try to start it when everyone’s up and out for the day and you can make an early start.
You’ll need the tiles of course, as well as water, a spirit level, thin-set mortar, tile cutter, bucket, grout float, rubber hammer, notched trowel, safety gloves and eye protection.
2. Measure up before your start
To work out how many tiles you need, start by measuring the stairs. Measure the length and width, taking care to include the vertical risers as well. Multiply the total length by the total width to get the total area in square meters.
‘If your stairs are an irregular shape, it’s best to divide different areas up for measuring and then add the separate measurements together to get an overall measurement for all of the stairs,’ advises Simon Reading, tiling expert at Housetastic. ‘It’s recommended that you add an extra 10% to your final measurements to accommodate for any mistakes or breakages during the installation.’
3. Prepare the stairs
Once you’ve measured the space to see how many tiles are required and bought your tiles, you need to ensure the area is level, dry and clean. This will prevent any cracks forming in the tiles once applied. ‘Before tiling, your floor must be completely secure without any obvious movement,’ recommends Harriet Goodacre, brand communications manager and tile consultant at Topps Tiles. ‘Depending on the weight of your tiles, you may need to reinforce the stairs themselves – for this, we recommend enlisting a professional’s help.’
Use a spirit level and if there are any uneven areas, create a smooth surface ready for tiling with a mortar and trowel. For wooden staircases, Simon Reading also recommends adding backer boards to each step. ‘Tape each joint and then tile over the boards. This is because wood can expand over time, so the grout is more likely to crack if you tile on top of natural wood,’ he says.
4. Apply adhesive
First, add a few drops of water with a wet sponge to the tile adhesive to help it bond to the staircase. Don’t add too much though. Next, using the flat edge of a notched trowel, apply a layer of adhesive to the surface of the stair.
‘Create a semi-circle to ensure an even and consistent layer of adhesive,’ says Simon Reading, ‘And be sure to cover a wider space than the tile itself of around two inches, as this will allow you to correct any misjudgements. Once you have applied this even layer, you can then move on to use the comb side of the trowel to help ensure the adhesive is even while also allowing it to better bond to the tile.’
5. Lay the tiles
Have your tiles ready, including any cut ones, so that you can crack on without any interruptions and prevent the adhesive drying out before you’ve finished. Use the spirit level to make sure all tiles are straight and even. You can use a rubber hammer and tap gently for any tiles that aren’t even. Don’t tap too hard as this will crack the tiles.
‘Mark a middle point on every riser and work from the centre outwards - use your trowel to apply adhesive to the back of the tiles and apply to the riser, lining the upper edge of the tile flush with the edge of the stair tread,’ advises Harriet Goodacre. ‘Next, apply the tiles to the stair tread, lining up the tile so it’s flush with the edge of the riser tile. Finally, place the tile on a bed of adhesive, press down and slide into place to ensure the adhesive sticks properly. Use a spirit level to ensure it’s even and flat, then insert a tile spacer in between each tile for even spacing.’
5. Finish with grouting
Once you’ve finished tiling and the adhesive is dry, you can move on to the grouting between the tiles. This will help to keep them in place. Take the grout float to smooth out the grout over the gaps and press firmly into each joint. Once it’s set, wipe the surface with a damp cloth the remove any excess. Leave for 24 hours for everything to set fully then finish with a final wipe down with a damp cloth.
Which tiles are good for stairs?
Porcelain is the most recommended tile for stairs. This is because it’s a material which is strong, hardwearing and will last a long time. There are all sorts of decorative patterned designs to choose from, as well as timber and stone lookalikes that can be matched with flooring in the hallway and downstairs area for a cohesive look.
How do I tile a bullnose staircase?
For this type of staircase, you’ll need enough bullnose tiles for all the outer edges of the stair treads as well as tiles for the treads and risers. Tile the bullnose first then the tile between the bullnose and riser and then the riser pieces. Use tile spacers to help.
Sign up to the Homes & Gardens newsletter
Design expertise in your inbox – from inspiring decorating ideas and beautiful celebrity homes to practical gardening advice and shopping round-ups.

Hayley is an interiors journalist, content provider and copywriter with 26 years experience who has contributed to a wide range of consumer magazines, trade titles, newspapers, blogs and online content. Specialising in kitchens and bathrooms, she has twice won the CEDIA Award for Best Technology feature. Hayley writes for H&G about kitchens, bathrooms, cleaning, DIY and organizing.
-
 5 sofa styles to avoid if you want a timeless living room
These sofa styles are the ones to avoid if you want to future-proof your living room, according to interior designers
By Ruth Doherty Published
-
 5 low-energy and useful tasks to try instead of doom-scrolling – this brain hack will break bad habits
Experts urge you to try it for your wellbeing
By Chiana Dickson Published
-
 7 dorm room organizing rules for less clutter and more space
Experts offer their top tips for creating a well-organized dorm room, no matter the size, space, or layout.
By Ashley Chalmers Published
-
 How to maximize storage in a small or shared dorm room, according to pro organizers
Find out all the hidden storage zones you might never have noticed
By Ashley Chalmers Published