
Knowing how to propagate agaves is a satisfying and simple skill to learn. Loved for their sculptural shapes and beautiful green hues, as well as for their easy care requirements, these succulents top the popularity stakes both in the garden and as low-maintenance houseplants.
Among the best desert plants, there are more than 200 species of agave. They vary in size, but luckily propagating them is similar for most types. This is due to the pups, which grow out from the base of the mature plants, or sometimes on a stalk. The former are called offsets, while the latter are known as bulbil, but both are clones of the mother plant and are generally referred to as pups or offsets.
Thankfully, increasing the number of agaves in your yard is easy to do yourself, if you follow the advice from our gardening experts.

How to propagate agaves
Agaves can be grown from seed. However, removing the pups and replanting them is the simplest and most widely used method to propagate agaves.
'Most but not all agaves form offsets, primarily earlier in their lives before they have an agave 'menopause' and stop; eventually blooming and dying in maturity,' explains Jeff Moore, founder, Solana Succulents and co-author with horticulturalist Jeremy Spath of Agaves in Habitat & Cultivation.
'There are a minority of agaves that rarely if ever form offsets, so must be grown from seed. These are usually more rare in cultivation, not necessarily because they are difficult to grow, but because it is a time-consuming job to collect seed and grow the seedlings.'

Jeff Moore has owned and run succulent nursery, Solana Succulents in Solana Beach, since 1992. He has authored and co-authored five books on Agaves and other succulents.
1. Propagate when it's warm

Plants respond to nature's cycles and seasons and agaves are no different. Despite being succulents accustomed to arid conditions, the timing of your agave propagation may impact its outcome, according to Jack Kelly, horticulturalist, University of Arizona College of Agriculture & Life Sciences
'Taking cuttings when temperatures at night are conducive to rooting and root development is the key to success,' says Jack. 'As a rule, cuttings taken when nighttime temperatures are 60°F (16°C) and above will root successfully.'
'If you're propagating agave outdoors, the weather becomes a big factor,' says Greg Starr, owner, Starr Nursery. 'In the desert southwest the ideal time is generally in the late summer and early fall, with cooler daytime temperatures, warm nights, and higher humidity due to summer monsoons.
'Starting offsets or bulbils can be done if the soil temperature is warm enough, probably above 65-70ºF range. I usually wait until nighttime temperatures are in the high 60s to mid-70s and daytime temperatures are under 100ºF.
'I'll pull them during spring, summer, and fall and start them outdoors in pots with my regular cactus mix. The soil should be kept slightly moist but not soggy wet.'
'In California, you can start agave offsets any time of the year, but if you live in a winter cold climate, you would need a greenhouse October-April,' says Jeff Moore.
'Most agaves can be grown outdoors year-round in most of California and the US southwest. Some cold-hardy varieties will grow across the gulf states, as well as up into Oregon and Washington. But most agaves are from Mexico, so don't like freezing or snowy winters–they do best in zones 8, 9 and 10. However, there are exceptions.'

Greg Starr is owner of Starr Nursery, a mail order nursery founded in 1985, specializing in cacti, succulents and agaves, located in the desert Southwest. Greg has authored two books on the topic of agaves and succulents.
2. Wear gloves and long sleeves

Who hasn't been jabbed by a prickly cactus or spiky succulent? They may look beautiful, but it's important to protect yourself properly when taking cuttings from agaves.
'When working with agaves and other spiny plants, care must be taken to avoid being injured while handling the plants,' says Jack Kelly. 'Always wear gloves or use tongs and avoid contact with the plants.'
3. Choose offsets from healthy plants

Like any form of propagation, diseases can be easily spread amongst plants. Checking the mother agave before you take any offsets or pups will prevent potentially spreading disease or problems to other parts of your yard.
'Always take cuttings from healthy plants,' says Jack Kelly. 'Do not propagate cuttings that are badly blemished, bruised, diseased, shrivelled, rotted or otherwise not clean and healthy.'
4. Carefully access the pups

Taking cuttings from most agave species is easy, as the "mother" plant pushes out offsets or "pups" on a stem from its base, or on a stalk. These offsets or bulbils look like mini versions of the mature agave and can be cut or twisted off. Although, they may be buried in soil, or wedged beneath the mature plant, so you may need scrape the soil away or dislodge the "mother" agave.
'If your agave is in a pot, the best way to detach the offsets is to lift the agave out of its pot, so you can pull them off easier from below,' says Jeff Moore. 'You typically will get a rosette, ideally at least a few inches across, attached by an umbilical stolon to the parent plant. You can cut or pull off the stolon, and hopefully there will be some nascent new roots beginning around the pup.'
'To split off pups from agaves in the ground, take a shovel and gently lift up the side of the mother plant that has the pup,' says Sam Niemann, founder, Bleume. 'Once I have lifted up the mother plant to expose the pup, I will gently twist off the pup.
'After the pup is removed from the mother plant, I gently reset the mother plant making sure that the roots are re-covered in soil.'

Sam Niemann is a lifelong gardener whose passion for plants and nature has been the driving force behind his extensive knowledge and expertise in horticulture. After founding Grown by Design, a boutique landscape design firm specializing in high-end residential projects, Sam is now developing Bleume, a high-quality home and gardening brand.
5. Keep some of the stem on the pup

Agave pups will form new roots, however if you don't see any, experts suggest leaving a little of the stem or stolon to allow this to happen.
'Always leave a small portion of the stem that connected the offset to its parent on the base of the offset,' says Jack Kelly. 'It is in this area where new roots will develop. If you cut too close to the base of the offset, the roots will not form.
'Whether an outdoor agave is in the yard or an indoor plant, when separating an agave pup, cut the attached rhizome just below the baby plant’s root system so that the pup retains its roots,' says Lindsay Sisti, author, The Ultimate Guide to Houseplant Propagation.
'Depending on the plant, your cut may be right near the base of the mother plant, or closer to halfway along the rhizome. No matter how long your pup's rhizome ends up being, if it has a root system of its own, with proper care, it will hit the ground running (growing) once you plant it.
'These offsets with roots may appear broken when you first separate them, but they are actually whole. Give them a little love and they will thrive independently.'

Lindsay Sisti is founder of the brand All the Plant Babies, including a successful Etsy shop where she sells unusual and tough-to-propagate houseplants. She specializes in propagation and hybridization and makes complex information accessible to everyone.
6. Plant the offset in cactus/succulent potting mix

Some gardeners allow the pup stems to dry out before planting them, while others don't. Generally, if your pup has roots attached it doesn't need to be left to dry.
'Assuming you are planting your pups straight away into some dry soil, you don't need to dry them out first,' says Jeff Moore. 'Dipping them in rooting hormone isn't necessary either, but it might help.
'Just plant them in a pot of cactus/succulent mix, which should contain a generous amount of pumice and/or perlite.
'Wait a few days before watering, then water again when dry. The pups might shrivel for a few weeks until they begin to soak up water.'
'Occasionally, the agave pup will come with roots attached. but often they will have no roots. So I let the cut ends callous over for a few days in a dry, shaded spot such as a garage,' says Sam Niemann.
'Then once the cut ends are calloused over, I set the cuttings in moist cactus and succulent potting mix making sure the cut end is in the soil and the cutting stands up. From that point on, the cuttings can be cared for like any other succulent.'
7. Water your agave pups weekly
'Your watering schedule in warm weather should be once to twice a week, providing that the soil has dried out between waterings,' says Jeff.
'All agaves love the sun, so slowly expose the new pups to more and more sun until you can locate them to the sunniest place available. If indoors, they need to be on a window ledge, almost touching the glass.'
Shop agave propagating essentials

Made from pigskin, these long leather gardening gloves will keep your hands cool and comfortable, whilst protecting you from prickly plants.

Plant your agave pups straight into larger pots or flower beds when they're ready, in these biodegradable seedling pots. The pots will decompose into an organic fertilizer giving your pups the best start.

No type of soil is too dry and impenetrable with this heavy-duty, stainless steel gardening trowel with its pointy tip. The loop on the handle allows for easy storage in the garden shed too.
Plant propagation is an easy and free way to grow your plant collection. Why not create a small table display with your cuttings? Agave plants look particularly effective when grown in colorful ceramic pots, which is a surefire way to add impact to your outside dining space.

-
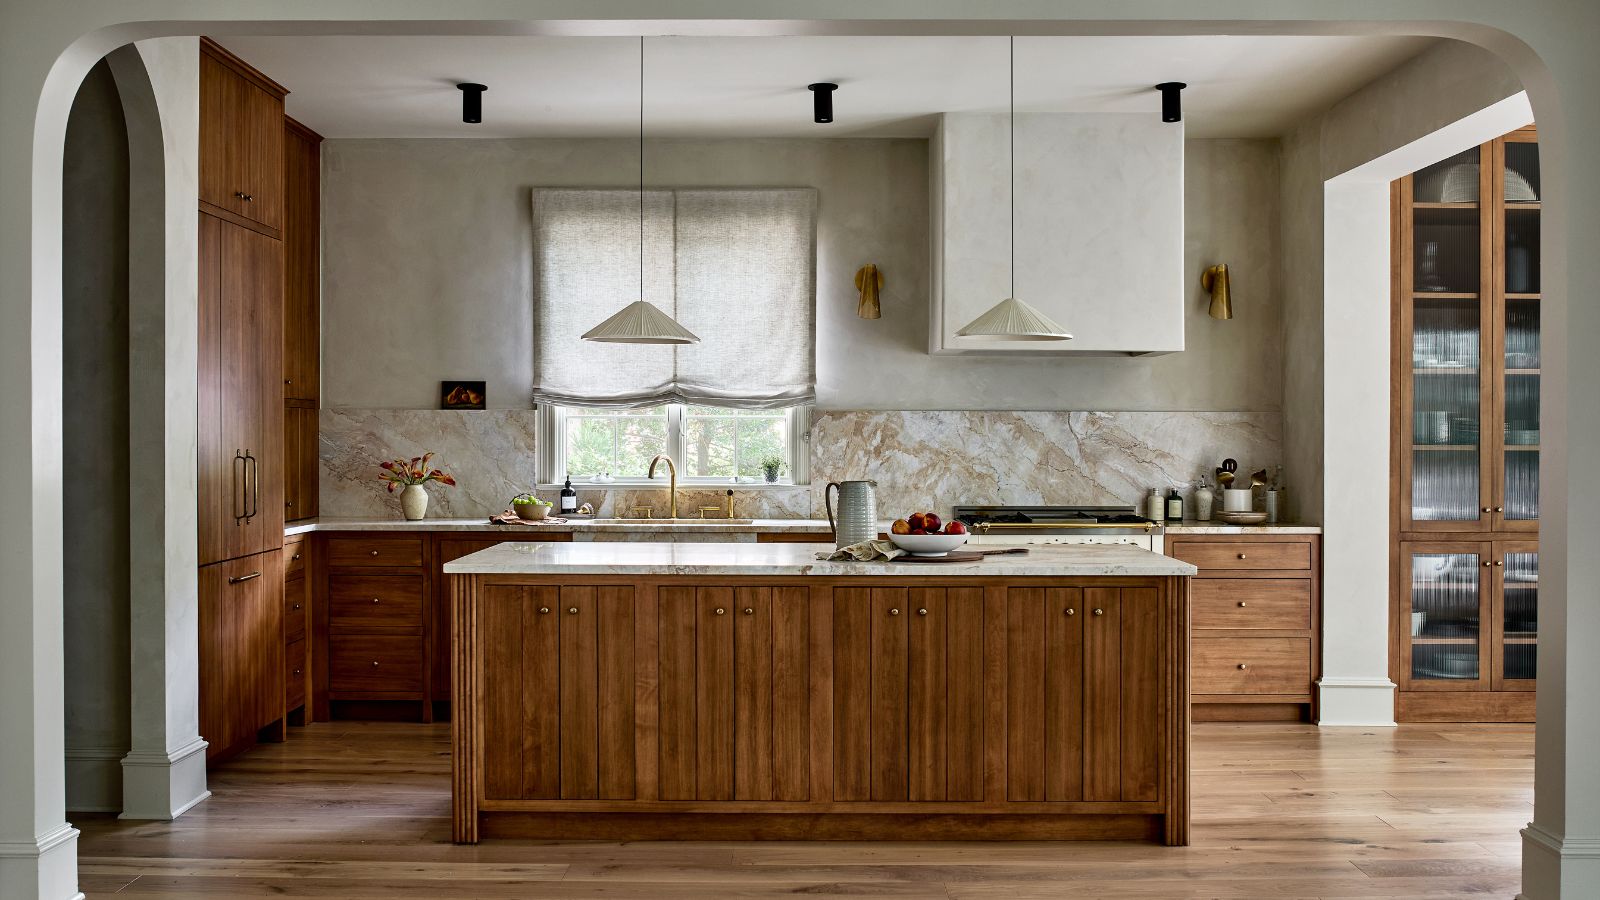 This kitchen has been transformed from cramped and outdated to warm and welcoming – and it's all thanks to a few thoughtful Japandi-style features
Warm wood tones, textural designs, and considered contrast are key to this beautiful transformation
-
 This brilliant $4 drawer organizer helped me reclaim control of my chaotic underwear drawer – and turbocharged my mornings
It makes heaps of difference when I'm getting ready

